Ever found yourself unprepared for a minor injury? This guide empowers you to assemble a first-aid kit perfectly tailored to your needs. Whether for hiking, home, or simple peace of mind, we’ll cover essential supplies, compare pre-made and custom kits, and provide a straightforward method for creating a kit that’s exactly right for you. Learn to choose the optimal bag, maintain its contents, and discover expert recommendations for must-have items. Let’s equip you to handle life’s little mishaps with confidence.
Why a Well-Stocked First Aid Kit is Non-Negotiable
Accidents are inevitable. Whether you’re navigating challenging terrain, a bustling city, or simply your daily routine, a well-equipped first-aid kit can be indispensable. Preparation, not paranoia, is key. Consider your kit a readily available personal emergency response team. Studies show that a comprehensive first-aid kit can effectively manage over 90% of minor injuries at home, reducing the need for costly and time-consuming trips to the doctor for basic care.
Assessing Your Needs: What Should Your Kit Include?
Before assembling your kit, assess your lifestyle and anticipated needs. Are you an avid outdoor enthusiast? A frequent traveler? Or primarily concerned with household incidents? Your kit’s contents should reflect your typical activities and environment to make the most of the kit.
A hiker’s kit will differ significantly from one designed for a car, and both will differ from a home kit. Hikers might prioritize blister treatment and sprain support, while drivers might focus on items for minor vehicle accidents. By considering potential scenarios, you can determine the most likely injuries or illnesses you might encounter, informing your choices of what to include.
Building Your Custom First Aid Kit: A Step-by-Step Approach
Creating your own kit grants complete customization, ensuring you have exactly what you need, when you need it. Here’s a step-by-step guide:
Step 1: Selecting Your Carrier: Choose a durable, water-resistant bag or container for your supplies. Size is crucial; opt for something spacious enough to hold everything comfortably, yet remains portable and easy to carry. Decide between a backpack-style kit, a compact case, or another option. Consider a bag with multiple compartments or zippered sections for easy organization.
Step 2: The Essentials – The Must-Have Supplies: These are the non-negotiable staples for any basic first-aid kit.
- Wound Care: A variety of adhesive bandages in assorted sizes (small, medium, large, knuckle bandages, butterfly closures), antiseptic wipes (individually wrapped), sterile gauze pads (various sizes, for absorbing blood and cleaning wounds), hypoallergenic medical tape (for securing bandages), antibiotic ointment (to prevent infection), small, sharp scissors (for cutting bandages, tape, or clothing), and tweezers (for removing splinters, debris, or ticks). These are your first line of defense against cuts, scrapes, and minor burns.
- Pain and Allergy Relief: Include over-the-counter pain relievers such as ibuprofen or acetaminophen. Ensure you have appropriate dosages for adults and children (if applicable). Pack antihistamines (like diphenhydramine) for allergic reactions. If you have known allergies, add your prescribed epinephrine auto-injector (EpiPen) and ensure you know how to use it properly.
- Hygiene and Sanitation: Hand sanitizer (containing at least 60% alcohol) is essential for maintaining hygiene. Include individually packaged soap sheets or a small bottle of liquid soap for wound cleaning. Consider water purification tablets or a portable water filter for access to safe drinking water, especially in outdoor settings.
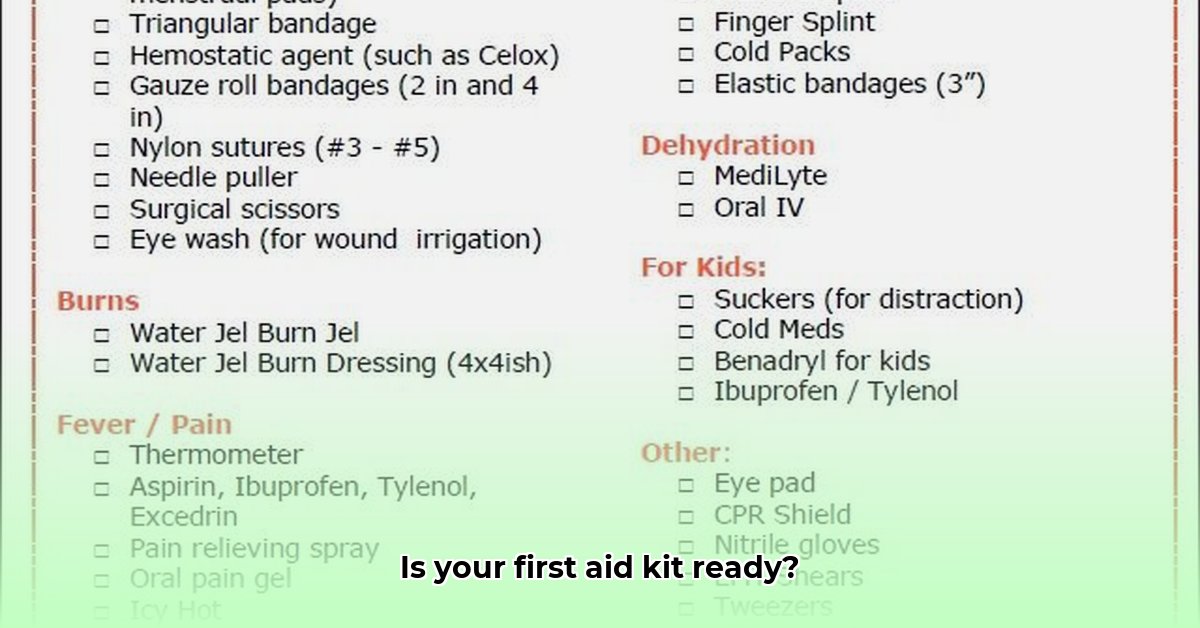
- Additional Critical Items: A comprehensive first-aid manual (or a reliable, downloadable resource on your smartphone), safety pins (for securing slings or clothing), at least two pairs of non-latex disposable gloves (to protect yourself and the injured person from contamination), and a compact emergency blanket (to prevent shock and hypothermia). A mylar blanket can retain up to 90% of body heat and is lightweight and easily packable. Consider adding a CPR mask for providing rescue breaths during CPR.
Step 3: Customizing Your Kit: Tailor your kit to your specific needs and potential scenarios.
- For Outdoor Adventures (Hikers, Campers, Climbers): Add items like blister treatment pads (moleskin), insect repellent (containing DEET or picaridin), high-SPF sunscreen (SPF 30 or higher), a signaling whistle, a compass, a map of the area, a headlamp or flashlight with extra batteries, a fire starter (lighter, waterproof matches, or fire starter cubes), and duct tape (for gear repairs and securing splints).
- For Motorists: Include jumper cables, a portable tire inflator, a reflective warning triangle or flares, a window breaker/seatbelt cutter tool, and a brightly colored safety vest.
- For the Workplace: Consult your workplace’s safety guidelines and OSHA regulations. Specific items may be required depending on the industry and potential hazards. Consider including eye wash solution, burn cream, and a bloodborne pathogen cleanup kit.
Step 4: Organizing for Efficiency: Arrange your items logically for quick access in emergencies. Use smaller, labeled pouches, dividers, or containers within your main bag to keep items organized and prevent shifting. Consider using a color-coding system to quickly identify specific types of supplies (e.g., red for wound care, blue for medications). A tackle box or craft organizer can also be repurposed for organizing a first-aid kit.
Step 5: Regular Maintenance – Keeping it Ready: Inspect your kit regularly (every 3-6 months). Replace expired medications, antiseptic wipes, and single-use items. Replenish used supplies. Check the condition of the bag or container itself for damage. Write expiration dates clearly on items with a permanent marker. Set a reminder on your phone or calendar to ensure regular maintenance.
Pre-Assembled vs. DIY First Aid Kits: Weighing the Options
Pre-made kits offer convenience and often meet basic safety standards. Building your own allows for precision and ensures you have exactly what you need. Here’s a comparative overview:
| Feature | Pre-Assembled Kit | Customizable Kit |
|---|---|---|
| Convenience | High; grab-and-go convenience. | Lower; requires time and effort for initial setup. |
| Cost | Can be more expensive initially, especially for high-quality kits. May contain low-quality or unnecessary items. | Potentially more cost-effective long-term, as you only purchase what you need. Can be expensive if buying individual items. |
| Customization | Limited; often contains generic supplies that may not meet your specific needs. | Complete control; allows you to select specific brands, sizes, and types of supplies. |
| Waste Reduction | Potential for unused items that expire, leading to waste. | Minimal waste; you only purchase items you know you will use. |
| Compliance | Pre-made kits may meet certain compliance standards (e.g., ANSI, OSHA), which is important for workplaces. | Requires careful attention to ensure compliance with relevant regulations. |
The best choice depends on your priorities, budget, and specific needs. A pre-made kit might suffice if convenience is paramount and your needs are basic. If you require a kit perfectly tailored to your specific needs and want to ensure high-quality supplies, building your own is the better choice.
Advanced Considerations: Specialized Equipment and Training
Advanced kits may include specialized items such as tourniquets, chest seals, hemostatic agents, nasopharyngeal airways (NPAs), or advanced wound closure materials. However, using these items correctly requires specialized training. Do not include these items unless you are properly trained and confident in your ability to use them safely and effectively. Seek out reputable training courses from certified instructors.
Remember, a first-aid kit is only one component of emergency preparedness. Understanding basic first-aid techniques, CPR, and how to recognize and respond to common medical emergencies is equally crucial. Taking a certified first-aid and CPR course will significantly enhance your preparedness and ability to help yourself and others in an emergency.
Building a Budget-Friendly, Comprehensive First Aid Kit: Practical Tips
Key Takeaways:
- Custom kits offer personalization, while pre-made kits are faster and may meet compliance standards.
- Your choice depends on your needs, expertise, and risk tolerance.
- A DIY approach might be suitable for home use, while pre-made kits are often recommended for workplaces or specialized situations.
- Regular kit checks and first-aid training are vital, regardless of your kit’s origin.
Assessing Your Specific Needs: A Targeted Approach
Before embarking on your how to build a cost-effective yet comprehensive custom first aid kit journey, pinpoint your primary usage location: home, workplace, camping trips, or travel. This will dictate your priorities. A basic home kit differs significantly from a wilderness survival kit or a workplace kit that must meet OSHA requirements. This initial assessment will streamline your supply selection. What are the immediate needs you aim to address with this kit?
Supply Sourcing: Pre-Made vs. DIY Re-evaluated
Pre-made kits offer convenience and certifications (essential for workplaces). Their cost-effectiveness stems from bulk purchasing. However, they might contain unnecessary items for your situation. The **how to build a cost-effective yet

- Master Vegan Freezer Meal Prep to Simplify Your Busy Schedule - June 18, 2026
- Vegan Freezer Cooking Simplifies Healthy Meals on Busy Nights - June 17, 2026
- Vegetarian Freezer Recipes for Effortless Meal Prep and Delicious Dinners - June 16, 2026